Scissor N1


Service Plans
Keep your Pion equipment running at its best.
Our support plans provide dependable service, predictable costs, and expert care to protect your investment and maximize uptime. With factory-standard maintenance and responsive support from our experienced engineers, you can focus on your research while we ensure your instrumentation performs reliably every day.
FAQs
- Fill one buffer vial with ORION electrode storage solution and cover with parafilm.
- Create two small holes for both electrodes and place electrodes inside filling solution.
- Ensure both electrodes are clean with no crystal build up and have sufficient filling solution.
- Replace the caps on both electrodes (Pull cover over filling solution hole on cartridge electrode).
- For long term storage (>6 months), place the electrodes into their respective boxes. Ensure there is sufficient liquid in the storage vials and that these are watertight with parafilm.
Below is our recommend procedure for calibrating the pH electrodes:
- The Pion Scissor has two modes: pH Calibration and Experiment

- Select pH calibration and click Start to highlight the first instruction in the experiment steps.
- Remove the caps from the electrodes and ensure the hole for the filling solution is exposed.
- Ensure each electrode is filled with the appropriate filling solution and that there are no air bubbles or crystals inside the electrodes. Filling solution levels should be just below the fill hole.
- Remove the electrodes from the storage solution, rinse them with deionized water, and put both electrodes in the pH 7 standard. Allow to stabilise for at least 30 seconds.
- Click Next to initiate the calibration. A 90-second countdown initiates on the top right corner.
- Once the countdown terminates, remove the electrodes from the pH 7 standard, rinse them with deionized water, and move them to the pH 4 standard. Allow to stabilise for at least 30 seconds.
- Click Next. Another 90-second countdown starts.
- Once the electrodes are calibrated, click Finish.
- Rinse the electrodes with deionized water and move them into the storage solution.
- To access the pH calibration history, click the icon on the Scissor toolbar. The electrodes are considered to have passed the calibration if the slope is above 90% (as seen on the pH calibration table) and if the millivolt values for pH 7 are between -25 and +25mV.

- If queries surrounding your electrode calibration values continue, please use this link to open a ticket.
- We recommend performing the electrode cleaning steps outlined below and repeating the electrode calibration:
- Ensure there are no crystals or air bubbles inside the electrode. Crystals can be dissolved with deionized water and the electrodes can be emptied and re-filled with filling solution.
- Rinse the electrodes with deionized water before placing them to soak for 5 minutes in 0.1M HCl.
- Rinse the electrodes with deionized water again before placing them to soak for 5 minutes in 0.1M NaOH, followed by another rinse with deionized water.
- Place the electrodes back in fresh storage solution and leave for at least 1 hour to soak.
- Re-try a calibration with fresh standards. If the slope is still below 90% after three consecutive attempts, please contact Pion.
- If using proteins, a 5-minute soak in 1% pepsin solution can also be performed to clean the probes after an assay.
- If queries surrounding your electrode calibration values continue, please open a ticket
- A likely cause for this could be that the CO2 supply pressure is too high. The instrument requires a CO2 supply to assist regulation of the chamber buffer pH. The CO2 must be supplied at a pressure of 0.1 Bar. If 0.1 Bar cannot be achieved, a value between 0.1–0.5 Bar is acceptable. Note that 0.5 Bar is the maximum and should not be exceeded.
- The CO2 valve operates every 2 minutes for approximately 0.1 seconds. Therefore, the amount of CO2 liberated into the atmosphere is very small but can only be calculated based on the actual pressure supplied to the instrument. Operators should ensure supply pressure is kept at or below 0.1-0.5 Bar.
- If quires surrounding your pH values continue, please open a ticket.
- This is most likely due to the instrument PC’s Windows Power Settings. Alter the PC power settings to prevent the computer from going to sleep, and to prevent USB ports from being deactivated to save power while the instrument is operating by performing the steps detailed below:
- Navigate to Control Panel > Device Manager > Power Options
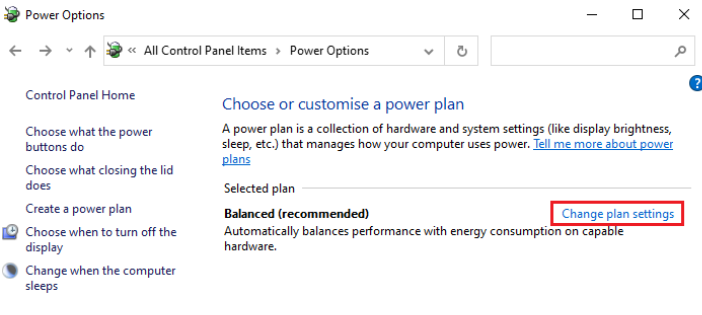
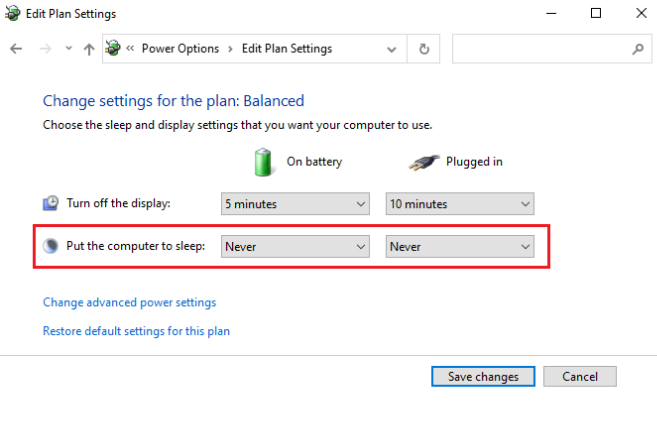
- Select “Change plan settings” for the currently active power plan. Ensure that “Put the computer to sleep” is set to “Never”.
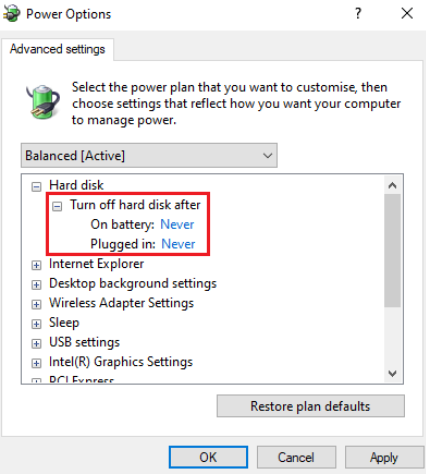
- Then, select “Change advanced power settings”. Ensure that the “Turn off hard disk after” entry is set for “Never”.
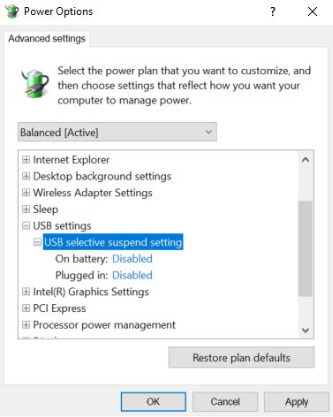
- Lastly, ensure that the “USB selective suspend setting” underneath “USB settings” is set to “Disabled”. If any changes need to be made, click “Apply” and then “OK” to save the changes.
- If you have verified the Windows power saving settings and the issue persists, please open a ticket.

Resources and Videos
Get the most out of your Pion instruments with our customer-focused resources and videos. Designed to answer your frequently asked questions, guide you through routine maintenance, and troubleshoot common issues, these resources help keep your workflows running smoothly.
Software Activation Code
Need to activate your Pion software or unlock additional features? Fill out the form with your information, and our team will provide your activation or unlock code promptly.


Submit a Support Ticket
Encountering an instrument issue? Submit a support request and our technical team will provide expert guidance to get you back on track quickly.